By: James Masucci
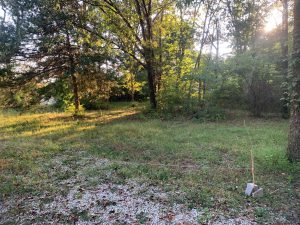
Yes! It fits! After having the sewer lines marked out and knowing I had to be at least 10 feet off them, laying down the corners helped convince me the building would fit where I wanted it. It also helped to visualize how it would lay in relation to the driveway and rest of the lot.
I’m writing about my honey house in three phases. In my last article, I bought land for my honey house. In this article, I’m going to describe how I came up with my design and what it took to get things ready to build. The first question I needed answered was whether a permit is needed. Since the answer was yes, I then needed to know what is required to comply with the building permit. Being completely ignorant, I called the county building department because the land is in unincorporated county. The big question was whether this was considered a commercial property or not, because commercial properties have more requirements. Luckily, because there will be not retail sales, meaning no customers, and few, if any employees, this qualifies for a personal storage space. Here are the main requirements for the application for a storage building/pole building/detached garage:
- Permit application form which wants to know what type of sewer, water, electricity, and gas services will be used and who will be installing them.
- A set of plans which state the depth of holes, type of material, size of lumber, and drawings of the wall sections and truss detail.
- A site plan which includes the location of existing structures and distance to property lines.
Basically, I need to know what I’m building, in detail, and where I am building it. I started by contacting a commercial beekeeper friend, John Miller, to ask him his thoughts. His first response was to ask me two questions, which everyone doing this should ask themselves. One, What is your business model? This is obvious because you need to know what you will need for your operation. The second was much more profound. What is your exit strategy? In 10-15 years when I retire from beekeeping, am I going to sell this to another beekeeper or to sell this as an improved property with a “not-too-customized” building. I chose the latter and this changed the way I thought about this. First, the primary building site I left alone so that someone can build a house there. I chose the “perfect site” for an awesome outbuilding that can be used as a shop, garage, boat storage, “man cave”, or even to put in an apartment.

I had to start thinking like a contractor. Clearing the land and pouring the foundation was not in my wheelhouse. I was able to find some good people to make it happen.
 Next, I sent him a list of problems that I was trying to solve with this building and asked his advice.
- I need a garage because I am getting an F450 bee truck and have no place to park it.
- I need a place to extract honey and I need an efficient honey extraction system. My garage is too small. The easier the extracting is for me, the more I will be willing to do. In the Spring and early Summer I always think I can run more bees. After extracting, I feel I have too many hives. I need to set aside room for a small, automated extraction line. That decision leads to the following questions. How big of a space? What type of flooring? What type of drainage? What do I need for clean-up? Hot water? Pressure washer?
- My kitchen is sticky for a month during honey season. I need a dedicated room for bottling. In MO, if you sell more than $50K gross in honey, you need to have an inspected facility. What do I need to pass inspection? Do I want an automated bottling system? What type of floor and drainage? What kind of washing station for jars?
- How much storage space will I need? There are honey buckets, feeders, supers, frames, boxes, sugar, water tanks, etc.
- I will need restrooms to pass the inspection for a commercial kitchen.
- What else?
I received a two page e-mail that is just full of priceless wisdom. But here are just a few of the suggestions I’ve incorporated into my design.
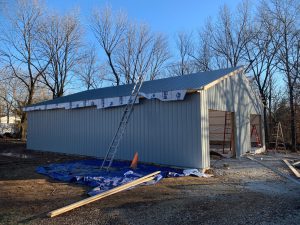
This is how it stands at the time this went to press. Four walls and half a roof. I will take you through the trials and tribulations of the build in the next installment.
“I have never built a building too big or with too high vertical walls”. Point taken. Having a loading dock on one side (for deliveries) and walk-in elevation on the other (handicap entrance). My slightly slanted landscape makes this possible. Concrete floors that are treated every year. Smooth finish slippery and a brushed finish traps wax. Neither one is great. Have drains in the floor big enough for a thorough flush otherwise you harbor hive beetles. Make sure the floor is tapered to the drains. Have enough outlets and run electricity (and compressed air) along the ceiling because the number one OSHA violation is electric cords on wet floors. Bees get into light fixtures so get sealed fixtures that you can wash. As for the kitchen, a bottler will be nice. I will need to have a storage tank to feed the bottler and need a way to pour my honey into that bottler. I need a clear path to go from storage to the bottling tank. If I’m in barrels, I need some heavy-duty lifting equipment or a pumping strategy. If I stay in five gallon buckets, I need to have a dumping strategy. I also need a way to deal with crystallization. Lastly, based on his recommendation, I have a space set aside for a cold room. I can either fumigate my hives for wax moths or put them in cold storage during moth season.
Next, I needed to determine size and type of building. Steel buildings are the cheapest, especially with Covid lumber prices. Another commercial beekeeper, Leo Rukin, was helping me with the types of buildings. He also wants to put up a new honey house and was also looking at steel buildings. I showed him what I was looking at and he said these were all tubular designs and he was looking at I-beam designs. I asked him the difference. He figured all designs would work; the biggest difference is how much weight you can hang from the “rafters”. For him, who may have lifts to raise heavy pieces of equipment, I-beam makes sense. For me, the cheaper, tubular or pole-barn designs make sense.
Then deciding on a size. I was originally thinking 30×50 but the “I’ve never built a building too big” mantra kept haunting me. Perhaps 40×60? While visiting our parents, my wife and I stayed at an air B&B. What luck. Right on the grounds were two outbuilding and based on my pacing, one was 30×50 and the other 40×60. If it weren’t for my truck needing a really big space (say 16×32), the 30×50 would have been plenty. But, I decided then to go bigger…until I got a quote from a local contractor of $116K to put up a 40×60 building. That did not include windows, doors, electricity, and sewer hook-up. Holy cow, what did I get myself into.
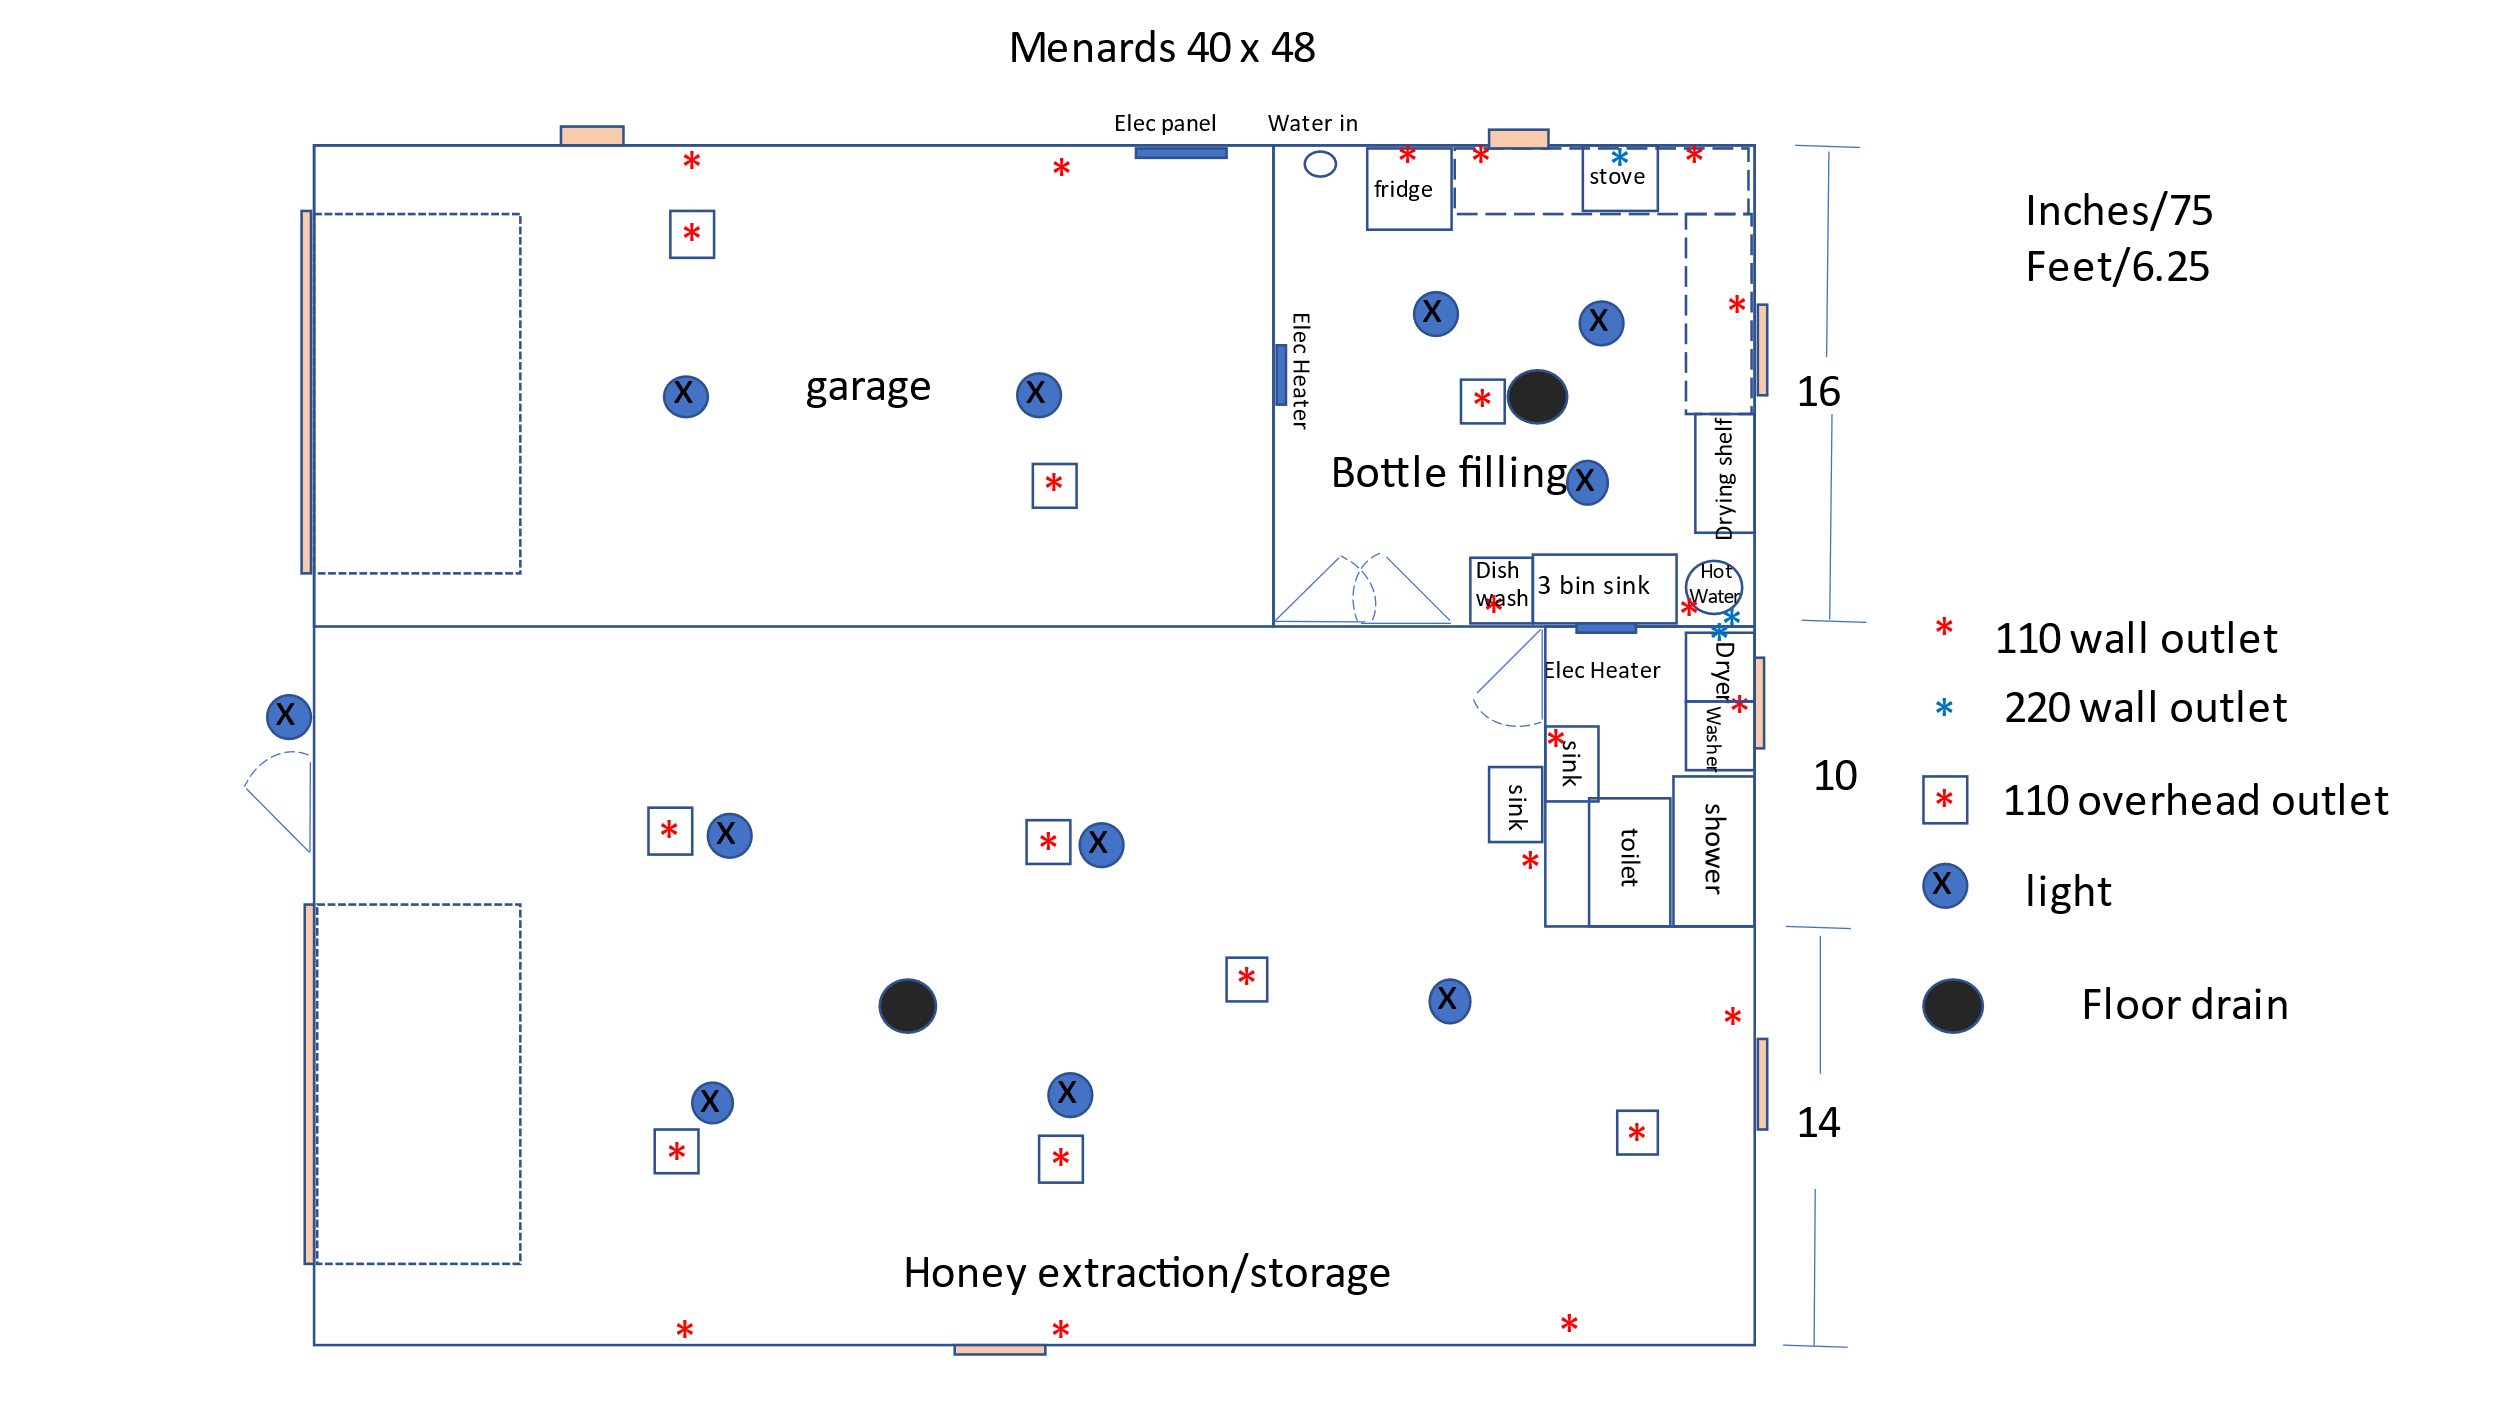
I finally settled on a 40×48 building. It allows ample space for a garage, bottling room, washroom, and extraction room. The space between the bathroom and the lower wall is where I will eventually put in a cold room. That leaves a 24×40 space for extraction and storage.
It was time to get serious and determine exactly what I needed and how much I could do myself. I was looking at buildings and developing floor plans at the same time. I was at a friend’s house and their bathroom had a shower, toilet, sink, washer and dryer in a 10×7 room. Perfect! I stole the design. I figured I needed a 16×32 space for my truck. It could be smaller, but I’d rather have extra room than being too tight. Then, I figured a 16×16 space for my kitchen/bottling area. Again, possible to go smaller, but this allows me to expand into it and store jars there. This got me to a 40×48 building. If price dictated, I could fit it into a 30×48 building, but the extra space will be utilized, I’m sure. I checked at my preferred building site, and it fits.
While looking at building designs, I found a tubular design that would allow me to install the building myself (and some friends). That made me feel better because I can save money doing that. Then, I spoke with some people that put up buildings they bought from Menards. It’s a wood frame pole building with trusses. I went online, used their design tool, and voila. $21K with 11% off I get it for $19K. This includes two garage doors, one regular door and six windows (see below). That, I can afford. The trusses scare me, but I have several strategies to put them up. That’s coming in the next article (I hope).
At this point, I had to stop thinking like a beekeeper and start thinking like a contractor. I needed someone to pour the slab. Turns out there are seven to eight different ways of pouring the foundation/slab and I got quotes ranging from $23K to $47K. I need water coming in from the well. I need electricity coming from the pole. I need sewer lines and drain lines set up before the concrete is poured. This is the stuff that I know nothing about. It took several phone calls to businesses that folks recommended to me and several meetings at the building site. It was/is a steep learning curve, but finally people are lined up and the plan is in place. The building permit application was submitted last week. Wish me luck. I will let you know how the construction goes.
Click here to go directly to Part 5 – A Place for My Honey House
]]>By: Shana Archibald
Ingredients:
1/2 cup butter, softened (1 stick)
8 ounces cream cheese, room temperature
1/2 cup honey
1 egg
1 teaspoon vanilla extract
1 teaspoon almond extract
1/2 teaspoon baking powder
1 3/4 cup cake flour *if you don’t have cake flour; add 2 tbsp of cornstarch to the same amount of regular flour*
Directions:
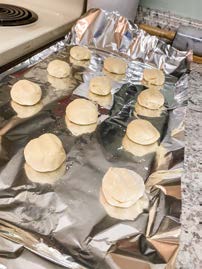
Line baking sheet with parchment paper. You can use aluminum foil, if you don’t have parchment paper. Cream together butter and cream cheese with electric mixer.
Add honey and beat for one minute. Add egg and beat to combine. Add extracts and beat until combined. Add in baking powder and cake flour (in three sections), mixing to combine.
Once incorporated, refrigerate dough for at least an hour. Preheat oven to 375°F. Dough will be sticky so use flour on your hands to roll out 1-2 inch balls. You can use the bottom of a cup/glass dipped in flour to gently flatten the balls, if you’d like. Don’t flatten too much or the cookies won’t puff up.
Bake for 9-11 minutes. Important: Pull them out when you see the underside edges turning golden. These cookies are the perfect “simple” cookie, and aren’t overly sweet. Feel free to add powdered sugar, your choice of frosting or glaze to them, for extra sweetness.
By: Dewey Caron
Empty bee boxes, all too common with varroa mite enhancement of virus epidemics in our bees, need bees. In those boxes our bees need drawn comb. Drawn comb is the most valuable resource for the bees and also for the beekeeper.
A good time to produce additional drawn comb is when establishing new colonies. Depending upon which hive we use and our beekeeping philosophy, we might use pure beeswax foundation, plastic frames with the comb template, empty frames or top bars with a leading edge to obtain more drawn comb. The bees may cooperate and draw the foundation orienting their comb within the frame or they may adopt their own (different) cross- comb orientation.
The best condition for comb building is an intense nectar flow. Good weather for forager flight and crowded hive conditions likewise helps. We can stimulate the bees to build comb by feeding bees or by hiving a swarm. Newly started colonies need comb fast and can be good comb builders as they are intent on raising brood. Once colonies grow a larger population, they need to continue to draw comb to store incoming nectar.
Started colonies need drawn comb fast. But if you add a second box too soon, outer combs of foundation not yet drawn may be ignored as the bees naturally prefer to move upwards. Positioning of foundation frames is critical to obtain the best comb. You can re-position frames – switch frames from outside toward the middle – but like everything else in beekeeping, timing is critical.
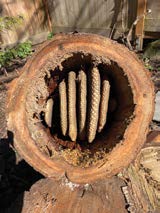
Parallel drawn natural comb
Starting a package
New beekeepers starting bees from a purchased package most likely means starting new frames lacking drawn comb. In advance of package arrival, you need assemble boxes then frames to position in the boxes. Next you secure the foundation in the middle of the frame. This is the most natural means. Assembly will take some time and positioning the sheets of foundation properly takes practice. Some beekeepers like to add only a starer strip (approximately one inch), rather than use entire sheets of foundation to save costs.
Use of plastic frames that have the six sided cell template will be an easier lift. Plastic frames with holes simulating cells are also available. Prices are comparable. Preassembled plastic foundation frames may require assembly of a wooden frame and then position of the plastic frame template. Others made entirely of plastic mean no assembly required.
Alternately you can purchase knocked down frames and assemble them and allow the bees to draw comb cells in the frame (foundationless). Warré hives have such frames. Top bar hives like the Kenya Top Bar hive feature just a leading edge to the lower surface of a bar at top that encourages bees to build their comb from the lower edge.
However you start, it is critical that bees draw their comb, whether from six-sided cell template foundation or top bar or foundationless frame, within the frame outline. You might have to cut comb built otherwise. This will waste their time and effort and be frustrating for the inexperienced starting beekeeper.
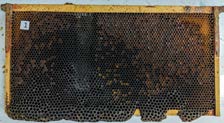
Frame to cull
Making more drawn comb
Bee colonies started as nucs or splits/divides will include some drawn combs from an existing colony. Nucs, smaller versions of starter colonies, mean you will purchase someone else’s drawn comb (usually three to five frames). Splits/divides are the same except the drawn comb comes from your donor colony. When the bees expand, you transfer the original nuc/divide frames into a standard eight or 10 frame box. At this transfer you will need to add additional frames of foundation unless you have drawn comb in storage to use.
Positioning the new frames on the outside of the drawn comb at time of transfer might be sufficient to get good drawn frames but the bees might ignore the foundation or only slowly add beeswax to draw the foundation. If weather is good and nights remain above 60 degrees, you can put the new frames right in the middle, positioning the drawn frames on both sides. There is danger of chilling brood with this division.
Alternately you can intersperse the new foundation frames among the drawn combs. One management option is one or two drawn combs, then a single foundation frame, then drawn comb. You sandwich the foundation frames between drawn frames.
You can also position two to three foundation frames together. If warm enough the bees will draw combs faster than putting the foundation frames on outside.
Whatever method used you can reposition foundation/foundation- less frames as the bees draw the new comb.
Paul Kelly of the University of Guelph has an instructive video on drawing of comb. View it at: https://www.youtube.com/watch?v=Q-8j5UExrg2o
When using foundationless or top bar hives, you will need to monitor progress of the bees drawing comb. They may not follow the desired outline. If you have some drawn comb, you can sandwich the foundation-less frames between them helping ensure the bees stay within the frame outline. Top bar frames are a different challenge as comb can be built at any angle and may wander off within a single top bar. After the bees start two to three combs new top bars can be positioned between the combs being drawn to achieve desired results.

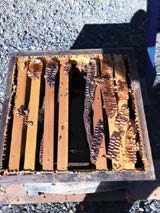
Foundation frames (new wood) interspersed between drawn comb
Culling older drawn comb (and producing newly drawn comb)
Early Spring is a time to cull some of the oldest frames, especially those of the bottom box once the bees move upward. New foundation frames are best drawn at the middle of the top box (where heat and bees are concentrated). Some of the capped brood can be moved to middle of lower box and the new replacement frames put in the middle of top, either as group or sandwiched between brood frames. At time of movement of frames down, the frames to be culled can be removed. Since bees will be in upper box you do not need to cull them immediately – move them to outside edge of the lower box and mark them so you remember which ones you wish to replace.
If you divide a strong colony, replace the frames removed with foundation or foundationless frames. Put these new frames to be drawn in the middle of the top. If the nectar flow is not strong, feed the colony sugar syrup at the top. You want the bees to give immediate attention to drawing comb. They must need the comb cell space.
The longer it takes to construct new comb, the greater the chances you will not obtain top quality comb. Ideally a foundation frame should be attended to within a matter of days by the bees. With foundationless or when using only a starter strip of foundation, you may get combs that have considerable drone sized cells. Since you are seeking “natural” some drone comb should be expected.
Why will bees delay drawing foundation? Perhaps the foundation is not close enough to the middle warmth of the colony. Or the colony is just not strong enough to need to expand their brood rearing area. Or the weather is too cool and the foragers are not able to get enough nectar or pollen to push colony expansion. Or you are seeking to draw foundation frames at a time other than the spring time when daylength is increasing (meaning bees are not in an expansion model).
If foundation is not being drawn ask a neighboring beekeeper, preferably a more established beekeeper in your club (via club message board, forum or during a meeting) for suggestions. There is no one right way to drawn foundation. If you ask three beekeepers you might get six responses and all of them might be correct.
Drawing comb for honey storage
If you are asking the bees to produce comb for nectar storage, the same conditions are applicable. Bees must be strong, there must be incoming nectar, brood or previously stored honey occurs in the majority of cells of brood boxes and weather allows the foragers to get at nectar-secreting plants. We super above (hence the name). Early in the season we recommend oversupering, using more super space and as the nectar flow is winding down to undersuper so bees can consolidate their stores.
Getting good drawn comb for honey might involve use of a queen excluder, or not. Some colonies are reluctant to move through an excluder — some term them honey excluders. It is good practice to “alert” the bees when you add a super. Let them know you added space. Challenge them by adding more space than they might initially need (oversupering).
If boxes are the same size, moving a frame from a lower box on which the bees are storing honey is one way of advertising your addition. Creating a mess by dribbling scented sugar syrup or honey on some of the frames is another way. Using previously used drawn comb helps too. If you don’t have enough, try mixing some foundation frames into boxes with some drawn comb.
After adding the initial supers, the same strategy will apply to adding more supers. Move a frame from existing super up into added super (bait the super), make a mess in the added super to draw the bees into it to clean up or you can bottom super – add the newest super below existing supers in which the bees are using to store honey.
Warre cross comb
Troubleshooting
Make sure you have your frames arranged so that they are tight up against each other when drawing foundation or they are tightly sandwiched between drawn combs. Do not leave any extra bee space – frames are designed with bee space in mind.
With top bar hives or foundationless frames, the bees might not follow the orientation you desire. If the spacing is wrong bees will start building comb as they please. You don’t want bees building across two frames rather than within the frame outline. If left uncontrolled, it can lead to more problems and you will basically end up with a cross comb hive. Your hive no longer will have comb that is removable. You will not be able to continue inspecting/removing comb with such a hive.
Sooner or later all of us forget a frame and discover that the bees have built frameless comb in the space. If filled with honey remove it and cut the comb to let the honey drain from the cells. If it contains brood, turn it into a foundation-less frame, keeping it until the brood emerges. Or simply cut it out and get rid of it. Most of us will attempt some salvage considering the time and effort the bees went through to cover which hive we use and our beekeeping philosophy.
Level hive
Kanoe Reidel in https://www.beepods.com/why-level-hives-areso-important-for-you-and-yourbees/ asserts gravity plays a big role in how bees build comb. She points out that “Bees naturally build comb in line with the pull of gravity. So, when a hive is level, they create that ideal comb structure.” Good drawn comb begins in a level hive.
Ms Reidel asserts that when a hive isn’t level and leans in one direction or another, “the bees are thrown off. “Instead of building a vertical comb, they might “build their comb in an asymmetrical or undesirable shape.” The comb drawn in a hive that is not level might then “encroach on adjacent frames, creating a… significant source of frustration for beekeepers that requires a lot of work to fix.” This can mean cross combs built outside the frame outline Note to self: level hives when drawing comb.
Burr comb
Burr comb, sometimes termed brace or bridge comb is wax comb which bees have built to fill in spaces greater than bee space. It usually is considered a nuisance for beekeepers because it bonds hive parts together and can interfere with frame inspection. Burr comb isn’t an uncommon occurrence, so we try to remedy the situation that gave rise to the unwanted comb building.
Burr comb can make a beekeeper’s life more complicated. In an ideal world, honey bees would build nice, neat frames of comb, and nothing else. But, given a chance, bees will bridge gaps with wax comb. If a space is too small bees plug the gaps with propolis to keep their hive clean. Anything bigger and you get burr comb.
So what can a beekeeper do to prevent burr comb, and what should you do when it (inevitably) appears? One approach is to remove any superfluous beeswax that is built in unwanted places. The bees have spent time and energy building comb that you don’t want and means you spend time removing it and the bees waste more time cleaning up behind you.
Our Langstroth hives and all other contemporary hives are designed with bee space dimensions in mind. Bee space is often taken into account below the bottom bars but also above the top bars. Bees can’t jump from one box to another, so they build burr comb as ladders. We remove it and they then replace it. If we use equipment from several manufacturers, the dimensions are slightly different, and bees do what bees do – fill the “extra space.”
Alternately we add a spacer – say for Apiguard use – and then we forget it. This is extra space and if conditions are right the bees will fill it. Or we put a feeder on in the spring and then an empty chamber to contain the feeder. When we forget it, the bees begin to fill it with comb. Alternatively, if we don’t space the frames correctly, the bees will build between two frames, which makes removing the adjacent frames complicated.
It’s generally recommended that we remove burr comb. But that creates a disturbance and if there is brood or honey in some of the constructed cells it will create a mess. Bees that don’t get out of the way are squished. Unless you have container for the scrapings, such as a plastic pail with a lid, you then have to contend with the bits and pieces. Some beekeepers leave the burr comb on top of the inner cover or inside an empty hive box so that bees can recover any nectar and wax. Don’t throw it on the ground or you might attract skunks or step on it and track it into a vehicle or your home. It might even begin robbing in the apiary.
A word of precaution. When you remove burr comb or cut out “extra” beeswax comb make sure the queen isn’t on the piece that you take out of the hive.
Building comb. Basic to our bees and a good management practice we can “play with” to help make beekeeping fun and profitable. How do you build drawn comb? For best results work with your bees.
]]> : An All-In-One Adjustable Hive Entrance
By: Erica Shelley , Tasmin Brown, Aparna Karthikeyan, Nicole Gauvreau, and Peter Kevan
What do Play-Doh, chocolate chip cookies, microwaves and penicillin all have in common? They were all accidentally invented while trying to develop something else.
The Protectabee, the patent-pending adjustable hive entrance, can be added to that inspirational list (although we will admit it is not chocolate chip cookie good!). We never intended to make a multi-functional bee product. In fact, it wasn’t until we were close to the end of our two-year project and testing with beekeepers that we understood the wide range of applications for the Protectabee.
In this month’s Bee Culture article, “Bee Vectoring with the Protectabee,” we outline the invention and functional testing of a device for delivering powders into a beehive with the ultimate long-term goal of improving bee health.
Integrating a new product into beekeeping requires more than functionality; it must also be easy to use. We posted on the Southern Ontario Beekeeper Facebook group to recruit a few beekeepers to test the Protectabee. To our surprise, within twenty-four hours, we had over 200 volunteers! Seventeen hobby, small scale and commercial beekeepers field-tested the Protectabee in their apiaries, answered follow-up questions online and in an interview (Figure 1).
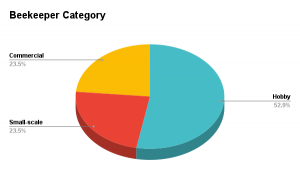
Figure 1
Overall, the beekeepers said they would likely purchase the Protectabee and found it very easy to use (Figure 2). As the Protectabee was built with the intention of bee vectoring, and powders are not currently sold, we were shocked when several beekeepers asked to keep the device after testing. The beekeepers found that the Protectabee decreased robbing by wasps and deterred skunks, among other advantages (Figure 3).
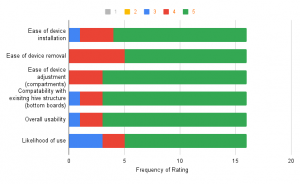
Figure 2
Questionnaire responses.
1 lowest rating – 5 highest rating
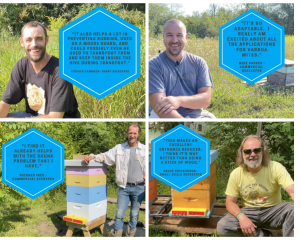
Figure 3
The Protectabee removable insert design allows the beekeeper to slide the cone inserts in on either side (Figure 4). Feedback from several beekeepers was that additional inserts could be designed to act as robbing screens, entrance reducers, closing up the hive and trapping small hive beetles. In fact, we received so many recommendations for the Protectabee that we realized we had an all-in-one device that could go to market immediately before bee vectoring powders were available.
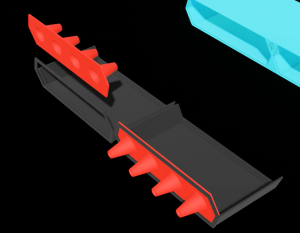
Figure 4
Inserts can be easily slid in and out of
the drawer
Currently, we have designed four different inserts to be delivered with our first Protectabees to be sold in February 2022 on Indiegogo: Cones, solid, and two sizes of entrance reducers. Both inserts and the drawers can be removed to allow maximum bee traffic while leaving the casing on the hive (Figure 5).
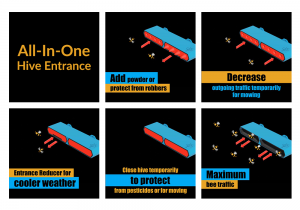
Figure 5
CONE INSERTS:
A. The cone inserts (Figure 6) can be used for robbing prevention, and in fact, similar cones are used to trap wasps into soda pop bottles. With the cone inserts, the bees can easily defend their entrances. Powders can also be used with the cone configurations, and as powders are approved for bee vectoring, they will be made available to beekeepers.

Figure 6
A bee exiting a cone
B. Another option with the cones is to turn both cone inserts “in” to reduce outgoing traffic. This “double in” configuration would only be used for a short time, but it can be helpful for mowing or other activities near a hive that can agitate the colony. It’s important to note that the bees can go in the small end of the cone, so not all outgoing traffic is blocked (Figure 7).
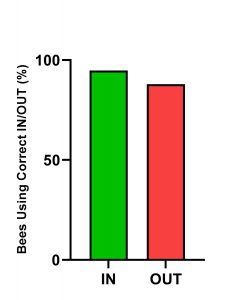
Figure 7
Average bee traffic in and out of cones was measured over three minutes. Correct usage would be entering the wide end of the cone or exiting the small end of the cone viewed from outside the hive.
ENTRANCE REDUCERS:
A. The Protectabee currently has two entrance reducers with the exact dimensions as those found on standard wooden entrance reducers. The drawer only needs to be slid out a small way to add in the entrance reducer. The entrance reducer can be combined with a solid insert for a single entrance, or two entrance reducers can be used on either side for two smaller openings.
SOLID INSERTS:
A. The solid inserts can be combined with the entrance reducer. Pollen patties or supplements can also be added to the drawer without disturbing the colony.
B. Two solid inserts can be used to close up the colony. This can be useful for moving or if pesticides are being sprayed nearby.
The Protectabee is currently compatible with 10-frame Langstroth and seven frame Flow hives.
To follow our journey or be notified when the Protectabee is available for purchase, please visit our website at bestforbees.com. 
By: Becky Masterman and Bridget Mendel
Did bees invent Valentine’s Day? No, they did not. The holiday was in fact established by Pope Gelasius in AD 495 in honor of a Christian saint by the name of Valentine. But that doesn’t mean you can’t utilize the holiday to promote pollinator-friendly actions at every turn, unprompted! Below are eight activities that will let your sweetheart know, “I love you, but I love pollinators more.”
1. Pivot the conversation from romantic sentiments to cold hard facts. The fact is, Saint Valentine was the patron saint of beekeepers.
2. Use the holiday to promote pollinator diversity! Stick a note in that box of chocolates, letting your new lover know that not all pollinators are bees. In fact, a small, humble fly called a midge is responsible for pollinating chocolate.
3. When presenting a single red rose to your crush, make sure to clarify that bees need flowers way more than they do. Keep their attention by explaining that not all roses are equally attractive to bees, and that bees prefer open, wild roses over highly cultivated ones that do not provide nectar and pollen. Furthermore, stem-nesting bees like to make homes in rose stems. In fact, you may want to take back that rose as you could just as well use it to create a solitary bee house.
4. Surprise your spouse when instead of your usual Hallmark card that says “Bee Mine” on the front, you enclose a very long, handwritten explanation about how and why honey bee hearts function. Explain that bees have an open circulatory system that moves hemolymph (insect blood) via a dorsal tube. Their heart, or dorsal aorta, is in their abdomen and moves hemolymph from their abdominal cavity, through the thorax to their heads while serving their immune system, transporting hormones and nutrients while facilitating thermoregulation. Honey bees are able to forage at relatively high and low temperatures due to the temperature regulation provided by their circulatory system.
5. When your special someone surprises you with a candle-lit dinner, use the opportunity to talk about pesticide contamination in beeswax. While it may ruin the mood, your partner needs to know that there are probably dozens of different chemical contaminants in those candles. The wax cappings from honey supers contain fewer pesticides than wax from the brood nest. Also, researchers are working on a process to remove most of the pesticides from beeswax (Calatayud-Vernich et al. 2019).
6. Comment on the fleeting nature of love by making your Valentine’s Day cards on flower seed paper. Your love may fade away, but your valentine card can be buried in the earth and sprout seeds as early as May or June, providing food for bees. To stay on message, check out the ‘bee a little punny Valentine’s Day card’ blog post referenced below for a tutorial on making the perfect card for the occasion.
7. While dropping off a box of bees on somebody’s doorstep is not always interpreted as merely whimsical, in some cases, surprise bees are appreciated. Show your love to a total stranger by giving them the gift of honey bees! With apicultural programs in Honduras, Nicaragua, Peru and Guatemala, Heifer International promotes and supports sustainable community development. Supporting beekeeping via this non-profit will help small scale farmers add additional revenue streams through sales of honey and wax.
8. If you don’t have a Valentine this year, you may consider baking. It’s self love in the best way. And don’t forget, even if it’s all about you, it’s also about the bees. Promote local beekeepers by adding honey to everything you bake, or don’t bake (Sioux Honey has five no-bake honey goodie recipes that will save precious time that you probably need to spend on your bees).
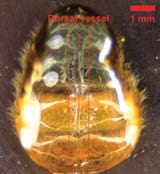
A dissection of a honey bee showing the position of the dorsal vessel (heart) in the abdomen. While hemolymph flows freely in the body cavity, it is circulated from the abdomen to the head via the dorsal vessel (O’Neal and Anderson, 2016).
Photo credit: Scott O’Neal
References and Resources
More about St. Valentine
https://www.history.com/news/6-surprising-facts-about-st-valentine
Learn about bee hearts and their circulatory systems
Hillyer JF, Pass G. The Insect Circulatory System: Structure, Function, and Evolution. Annu Rev Entomol. 2020 Jan 7;65:121-143. doi:10.1146/annurev-ento-011019-025003. Epub 2019 Oct 4. PMID: 31585504.
Michel J. Honey bee hearts. Proc (Bayl Univ Med C e n t ) . 2018 Dec 20; 32 (1) : 154 – 155. doi:10.1080/08998280.2018.1509578. PMID: 30956616; PMCID: PMC6442803.
Heinrich, B., & Esch, H. (1994). Thermoregulation in Bees. American Scientist, 82(2), 164–170. http://www.jstor.org/stable/29775151
Honey bee heart photo
O’Neal ST, Anderson TD. Dissection and Observation of Honey Bee Dorsal Vessel for Studies of Cardiac Function. J Vis Exp. 2016 Dec 12;(118):55029. doi:10.3791/55029. PMID: 28060305; PMCID: PMC5226400.
Where to buy bees for others
https://www.heifer.org/blog/st-valentine-patron-saint-of-beekeepers.html
Make Punny Beekeeper Valentines
https://breakingaverageblog.com/2021/02/07/bee-a-little-punny-valentines-day-card/
Pesticide removal from beeswax
Calatayud-Vernich, P., VanEngelsdorp, D., & Pic , Y. (2019). Beeswax cleaning by solvent extraction of pesticides. MethodsX, 6, 980–985. https://doi.org/10.1016/j.mex.2019.04.022
Valentine treats made with honey
https://siouxhoney.com/5-valentinesday-treats-made-with-honey/
Acknowledgement
The authors would like to thank Dr. Marla Spivak for helpful edits and suggestions and Scott O’Neal for granting permission to use his dorsal vessel photo.
Authors
Becky Masterman led the UMN Bee Squad from 2013-2019. Bridget Mendel joined the Bee Squad in 2013 and has led the program since 2020. Photos of Becky (left) and Bridget (right) looking for their respective hives. If you would like to contact the authors with your Valentine’s Day success stories or other thoughts, please send an email to [email protected]

Becky Masterman
Bridget Mendel
By: Jay Evans
A long time ago, in a treehole far, far, away, our honey bee heroines started a journey that would plant them throughout the globe. For generations, scientists have puzzled over the timing of all this and the location of that treehole, or treeholes. Kathleen Dogantzis, Amro Zayed, and colleagues have applied their expertise and the latest genomic technologies to address this puzzle in the most complete way yet. Their paper, “Thrice out of Asia and the adaptive radiation of the western honey bee” was just published in the journal Science Advances (Vol 7, Issue 49, and freely available at DOI: 10.1126/sciadv.abj2151). In this study they sampled the entire genomes of 251 honey bees collected from the historical range of Apis mellifera (the ‘western’ honey bee, the species that is dominant among managed honey bees). Amidst these sampled genomes are bees from Europe, Africa, the Middle East and Asia, all places vying to be the source of A. mellifera.
So how does a genome sequence solve genealogies of this sort? First, there are millions of single variants (mutations that have survived time and selection) in the 230 million nucleotides that define the honey bee genome. There are four possible nucleotides at each of these 230 million slots, giving ample space to build up differences. Many of these variants differ within individual bees, while many more differ within populations and subspecies. Still others are distinct for individual subspecies. The latter class of variation is especially useful for studies like this one, where the goal is to find signals that unite subspecies and tie them to a common past.
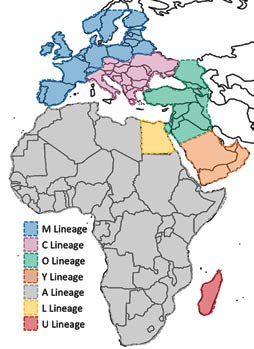
Amellifera Map
And how does one find and use these sequences? Genome sequences for bees, and all of life, really, are housed at the U.S. National Institutes of Health ‘Genbank’ resource (https://www.ncbi.nlm.nih.gov/). If you want all of the genome sequences used for this study you will soon find them at this site, alongside hundreds of other honey bee genomes including the ‘original’ honey bee genome sequence published in 2006. To tease apart differences between genomes, scientists align new sequences to a reference genome, head to tail along each of the 16 honey bee chromosomes. Mapping the genomic history of A. mellifera is helped by the fact that the genome of the Asian honey bee A. cerana, a close relative, is also known. Thanks to A. cerana, it is possible to ‘root’ each A. mellifera sequence to a long-gone bee that unites these two current species.
With buckets of data and this ‘root’ it should be easy to track the history of A. mellifera in the seven or so million years since this shared ancestor. Sadly, three facts obscure the honey bee family tree. First, evolution can happen in fits and starts and for much of the histories of the currently recognized subspecies not much happened. If new and informative lineages evolved, they either died out or have evaded scientists and their genome sequencing machines. In contrast, a lot happened in the world of A. mellifera in the past million or so years. If you picture the tips of the A. mellifera tree, they look like a palm tree with lots of branches right near the top, instead of an apple tree where important branches peel off lower on the trunk. Or, as argued by these authors, a three-tipped palm tree. This is really cool, because it shows that something really ‘clicked’ with A. mellifera more recently, allowing adaptation to diverse environments and climates and new dominance in the pollinator world (even prior to the human assist). We humans have caused a second bit of confusion in tracing the history of A. mellifera. For centuries, we have mixed and crossed otherwise solid subspecies, scrambling some of their unique histories. For one, European subspecies of A. mellifera have been returned to Asia under human management and have already shared genes with some of the Asian A. mellifera bees sampled in this project. Even the revered Middle-Eastern honey bee, Apis mellifera syriaca, shows a blend of distinct genetic codes reflecting admixture of other bees from close and far. Finally, there are large parts of the world where scientists have not scrutinized local honey bee stock, including areas where bees do not generally move around. To overcome these challenges, Dogantzis and colleagues combined an ambitious amount of collecting with the latest genomic toolkit to make sense of it all for us.
Photo by: Amro Z
The title of their paper gives away the punchline. It appears from this new effort that A. mellifera, like every other honey bee, got its start somewhere in Asia. Based on current populations this is likely western Asia, from which the ‘western’ honey bee moved west in waves to populate Africa, the Middle East, and Europe, long before we humans helped it move the rest of the way around the globe. Scientists had proposed this Asian origin before but it was challenged by data suggesting that the founding mothers of A. mellifera first leapt to Africa and then radiated out to the North and East from there. In the current paper, a first exodus from Asia led to the recognized African lineages of A. mellifera, while a second eventually gave rise to ‘carniolan’ and ‘Italian’ western subspecies, in sisterhood with ‘caucasian’ and ‘anatolian’ lines. A third lineage appears to have remained in Asia for millions more years before its own exodus, leading to the European ‘Spanish’ and ‘dark’ subspecies, A. m. iberiensis and A. m. mellifera. Each of these three branches can be tied to an Asian ‘root’, bolstering claims for an Asian origin of A. mellifera. The authors admit that ambiguities remain (science is great) and it will take heavier sampling, especially from Asia and ideally from ‘new’ lineages that are closer to the root of the tree, to build confidence in these results.
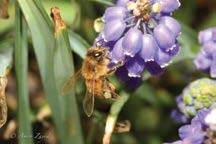
Photo by: Amro Z
Along with solving an origin story that has kept at least a handful of you up at night, this study gives practical insights into bee subspecies and races. The authors confirm the overall integrity of 10+ western and African subspecies, while bolstering several that were less solid, including a subspecies from the large island of Madagascar and key subspecies that remain viable in Asia. They also show 100+ specific genes that consistently pop up as evolving fastest on diverging honey bee branches. These genes are great candidates for understanding how managed bee lines react to climate, food, and perhaps even chemicals. It is apparent that many key genes are most active in worker bees as opposed to queens. This likely reflects the great range of environmental exposure found by workers across their lifetimes, from temperature extremes to close exposure to pollen and nectar chemicals. It might also reflect the larger behavioral repertoires of worker bees; dancing, defending, mapping, provisioning, etc., when compared to their own mothers. For queen breeders, these genes should be watched as markers for local adaptation, colony life histories and behaviors, and perhaps even responses to localized pests, pathogens, and chemicals. Honey bees continue on an epic and important journey. The fate of A. mellifera is in large part tied to humans currently, but a better understanding of its past struggles and successes should give new hope for ways to battle current forces and challenges.
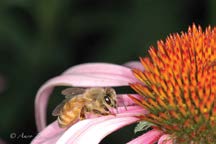
Photo by: Amro Z
By: Ross Conrad
The potential for harmful impacts from electromagnetic radiation to bees first came into the general public’s consciousness shortly after the emergence of Colony Collapse Disorder (CCD). It was the result of reports of a study in which cordless telephone base stations that emitted 1900-MHz electromagnetic field (EMF) radiation were set in hives and found to decrease comb building and increase the duration of foraging trips. (Kimmel et. al. 2007) The study was poorly designed, had a small sample size, and there was the small issue that beekeepers do not typically place mobile phone base stations used by cordless landline phones in their hives. As a result the idea of electromagnetic radiation harming bees was quickly discredited and became the subject of jokes and ridicule. I certainly wrote it off as inconsequential. This was an unfortunate situation because I have since found that when you look at the studies on the subject with an independent mind, there just happens to be enough peer reviewed research to suggest that there may in fact be cause for concern. The collective evidence drawn from scientific studies of the adverse health and biological impacts of artificial electrical field exposure from sources such as cell phone towers, cell phones, smart meters, power lines and WiFi routers may be jeopardizing the health of our bees and more.
What is EMF and EMR?
An electromagnetic field (EMF) is produced when electric and magnetic charges radiate energy (aka radiation). Electromagnetic radiation (EMR) is a kind of energy that includes radio waves and visible light. Even solar wind generated from the sun creates an electromagnetic field as it hits the earth which means that all life on earth is in the presence of electromagnetic fields. EMF radiation in wireless communication only works because the transmission is more powerful than the natural background radiation. These man-made sources of electromagnetic radiation greatly increase normal background exposure. Common sense suggests that biologically based scientifically sound public exposure standards be developed to protect the health and well-being of people, bees and other wildlife. Unfortunately, such standards do not exist for pollinators and wildlife, and studies suggest that even the human standards that exist are outdated and inadequate.
Electromagnetic radiation is measured in hertz (Hz) which represents the cycles per second of the wavelength. One hertz represents a single time that a analog sound wave or digital pulse repeats each second (e.g. one cycle per second). Kilohertz (kHz) measures thousands of cycles per second, Megahertz (MHz) refers to millions and Gigahertz billions of cycles per second. It is well established that EMR has the ability to seriously impact living organisms and that EMR of 900 MHz is highly bioactive causing significant changes in the physiological function of living organisms. (Aday 1975)
Radiofrequency electromagnetic fields (RF-EMF) are emitted from the wireless communication devices we use daily: radios and televisions, satellite communication systems, WiFi systems and wireless mobile phones and cell phones. RF-EMFs emit non-ionizing radiation. This differs from ionizing radiation of nuclear power plants in that while non-ionizing radiation has enough energy to excite the electrons in molecules and atoms (moving the electrons to a higher energy state) they do not knock electrons out of their orbits around atoms like ionizing radiation does.
The agency responsible for regulating the wireless communications industry is the Federal Communications Commission (FCC). Unfortunately, FCC radiofrequency (RF) safety guidelines have not been updated since their implementation in 1996. This is significant since these fields are about to get significantly stronger with the current roll-out of the fifth generation technology standard (aka 5G) for broadband cellular networks. Today no-one, including the Federal Communications Commission (FCC) knows whether 5G is safe or not. Even wireless carriers have to admit that they are not aware of any independent studies on 5G safety. When asked during Senate hearings what research has been done on the safety of 5G technology, the answer was “none”. (Blumenthal 2019)
Meanwhile, the public is consistently told that there is no need for anything to worry about concerning the rollout of this new technology that the FCC is pushing and if current plans come to fruition has the potential to result in over 800,000 new antenna installations throughout the U.S. providing fast 5G internet service to many Americans by the end of the decade.
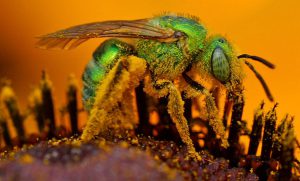
Honey bees and wild pollinators like this sweat bee pictured, are among the many insects that can be negatively affected by man-made sources of electromagnetic radiation.
Effects on insects
There is a growing body of evidence of harm from wireless non-ionizing radiation such as from cell phones, cell towers, WiFi, and smart meters can harm insects. A 2013 review of 113 studies that found that 70 percent of papers analyzed reported a significant impact of RF-EMF on birds and insects. This suggests an urgent need for more research and repetitions of studies given the fast pace of cellular telephone technological progress. (Cucurachi et. al. 2013)
Lab studies on insects show negative effects of EMR on reproductive success, development, and navigation abilities. However, the impact of widespread mobile telecommunication antennas on wild pollinator communities in field-realistic conditions is still largely unknown. In one trial, beetle, wasp and hoverfly abundance decreased with EMR, while the abundance of underground-nesting bees and bee flies increased with EMR. This cries out for additional research to understand the ecological impacts of EMR on wild pollinators and the subsequent effects on plant diversity, crop production, as well as human welfare. (Lázaro et. al. 2016)
In 2012 Sivani and Sudarsanam published a paper that states: “Based on current available literature, it is justified to conclude that RF-EMF radiation exposure can change neurotransmitter functions, blood-brain barrier, morphology, electrophysiology, cellular metabolism, calcium efflux, and gene and protein expression in certain types of cells even at lower intensities. The biological consequences of such changes remain unclear.” The authors further noted that short-term studies on frogs, honey bees, birds, bats and even humans are scarce and long-term studies are non-existent.
A review of the literature published just this past year came to the conclusion that there is sufficient evidence to support claims of damage caused by electromagnetic radiation. The study’s author goes on to state that “…electromagnetic radiation should be considered seriously as a complementary driver for the dramatic decline in insects, acting in synergy with agricultural intensification, pesticides, invasive species and climate change. The extent that anthropogenic electromagnetic radiation represents a significant threat to insect pollinators is unresolved and plausible.” (Balmori 2021)
Up until recently, the range of frequencies used for wireless communication has not risen above 6 GHz (2G, 3G, 4G, and WiFi). The impending deployment of the new and highly anticipated 5G technology utilizes a signal of 120 GHz. Research on insects showed that as the power density of frequencies above 6 GHz increased, the power absorbed by the invertebrates studied increased from three to 370 percent (Thielens et. al. 2018) making the importance of being able to understand the potential threat to pollinators from electromagnetic radiation all the more urgent.
Worker Bee Exposure
While lots of research documents the impacts of EMF on insects generally, some studies have looked at the impacts of electromagnetic radiation on honey bees and the majority of the papers have found potential cause for concern when honey bees are exposed to EMFs. Such exposure has been shown to cause significant cognitive impairment and behavioral changes. These include reduced locomotion activity, impaired homing and orientation abilities, fewer foraging flights and short-term memory loss. (Harst et. al. 2006; Warnke 2007; Kimmel et. al. 2007; Sharma and Kurmar 2010; Shepherd et. al. 2018; Lopatina et. al. 2019; Shepherd et. al. 2019) Many of these studies, and others, document increased aggression when bees are exposed to EMR. (Mixson et. al. 2009; Halabi et. al. 2014).
Meanwhile, in 2017 researchers found that DNA damage in honey bee larvae increased significantly when exposed to modulating EMR fields. Exposure levels during the trial were much higher than what honey bees in nature could reasonably be expected to encounter but the results suggest the need for further intensive research on all stages of honey bee development. (Vilić et. al. 2017)
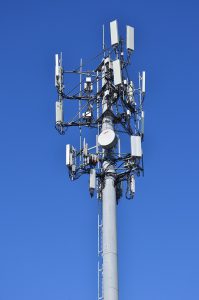
Cell phones and the towers use to transmit their signals are just one of many sources of man-made electromagnetic radiation.
Cell Phone Towers
Cell phone towers have been a focus of additional research, but unfortunately the few studies that have looked at the effect from cell phone towers suffer from small sample sizes.
Some studies have concluded that the effect of cell tower electromagnetic radiation on colonies placed directly under cell-phone towers is insignificant. (Mall and Kumar 2014, Patel and Mall 2019) However, these researchers placed colonies under the transmission antennae at the base of the tower where the radiation broadcast angle approaches zero degrees resulting in little-to-no radiation exposure.
One of the more realistic studies that looked at the impact of electromagnetic radiation (EMR) on hives exposed to cell phone tower emissions was done on the Eastern honey bee Apis cerana. (Taye 2017) Foraging behavior was observed in colonies placed at distances of 100 meters, 200m, 300m, 500m, and 1000m from a cell phone tower. Researchers documented significantly reduced colony foraging activity in the hives closest to the radiation source. Clearly more research is needed on impacts of cell towers before firm conclusions can be drawn on exactly how and under what circumstances cell phone towers may be harmful to bees and other pollinators.
Next month in part two of this article, we will look at the effects of RF-EMR on queens and share some ideas on what we as beekeepers might do to help reduce exposure to our bees and ourselves.
References:
Aday, W.R. (1975) Introduction: Effects of electromagnetic radiation on the nervous system, Annals of the New York Academy of Science, 247:15-20
Balmori, A. (2021) Electromagnetic radiation as an emerging driver factor for the decline of insects, Science of The Total Environment, (767):144913
Blumenthal, Richard (2019) At Senate Commerce hearing, Blumenthal raises concerns on 5G wireless technology’s potential health risks. https://www.blumenthal.senate.gov/newsroom/press/release/at-senate-commerce
Cucurachi, S., Tamis, W.L.M., Vijver, M.G., Peijnenburg, W.J.G.M., Bolte, J.F.B., de Snoo, G.R. (2013) A review of the ecological effects of radiofrequency electromagnetic fields (RF-EMF), Environment International, 51:116-140
El Halabi, N., Achkar, R., Haidar, G.A. (2014) The effect of cell phone antennas’ radiations on the life cycle of honeybees, Proceedings of the Mediterranean Electrotechnical Conference – MELECON DOI:10.1109/MELCON.2014.6820569
Harst, W., Kuhn, J., Stever, H. (2007) Can electromagnetic exposure cause a change in behavior? Studying possible non-thermal influences on honey bees – An approach within the framework of Educational Infomratics
Kimmel, S., Kuhn, J., Harst, W., Stever, H. (2007) Effects of electromagnetic exposition on the behavior of the honeybee (Apis mellifera), Environmental Systems Research, 8: 1-8
Lopatina, N.G., Zachepilo, T.G., Kamyshev, N.G., Dyuzhikova, N.A., Serov, I.N. (2019) Effect of Non-Ionizing Electromagnetic Radiation on Behavior of the Honeybee, Apis mellifera L. (Hymenoptera, Apidae), Entomological Review, 99(1): 24-29 DOI: 10.1134/S0013873819010032
Lázaro, A., Chroni, A., Tscheulin, T., Devalez, J., Matsoukas, C., Petanidou, T. (2016) Electromagnetic radiation of mobile telecommunications antennas affects the abundance and composition of wild pollinators, Journal of Insect Conservation, 20:1-10
Mall, P., Kumar, Y. (2014) Effect of electromagnetic radiation on brooding, honey production, and foraging behaviour of European honey bees (Apis mellifera L.), African Journal of Agricultural Research, 9(13):1078-1085
Mixson, T.A., Abramson, C.I., Nolf, S.L., Johnson, G.A., Serrano, E., Wells, H. (2009) Effect of GSM cellular phone radiation on the behavior of honey bees (Apis mellifera), Science of Bee Culture, 1(2):22-27
Patel, S. and Mall, P. (2019) Effect of electromagnetic radiations on the foraging activity of Apis mellifera L., J. Exp. Zool. India, 22(1):449-451
Sharma, V.P. and Kumar, N.R. (2010) Changes in honey bee behavior and biology under the influence of cellphone radiations, Research Communications, Current Science 98(10): 1376-1378
Shepherd, S., Hollands, G., Godley, V.C., Sharkh, S.M., Jackson, C.W., Newland, P.L. (2019) Increased aggression and reduced aversive learning in honey bees exposed to extremely low frequency electromagnetic fields, PLOS ONE https://doi.org/10.1371/journal.pone.0223614
Shepherd, S., Lima, M.A.P., Oliveira, E.E., Sharkh, S.M., Jackson, C.W., Newland, P.L. (2018) Extremely low frequency electromagnetic fields impair the cognitive and motor abilities of honey bees, Scientific Reports, 8:7932, doi:10.1038/s41598-018-26185-y
Sivani, S., Sudarsanam, D. (2012) Impacts of radio-frequency electromagnetic field (RF-EMF) from cell phone towers and wireless devices on biosystems and ecosystems – a review, Biology and Medicine, 4(4):202-216
Tay R.R., Deka, M.K., Rahman, A., Bathari, M. (2017) Effect of electromagnetic radiation of cell phone tower on foraging behavior of Asiatic honey bee, Apis cerana F. (Hymenoptera: Apidae), J Ent & Zoo Studies 5(3): 1527-1529
Thielens, A., Bell, D., Mortimore, D.B., Greco, M.K., Martens, L., Joseph, W. (2018) Exposure of insects to radiofrequency electromagnetic fields from 2 to 120 GHz, Nature Scientific Reports, 8:3924
Warnke, U. (2007) Bees, Birds and Mankind: Destroying nature by ‘electrosmog’, Effects of wireless communication technologies, by the Competence Initiative for the Protection of Humanity
Vilić, M., Gajger, I.T., Tucak, P., Štambuk, A. Srut, M., Klobucar, G., Malaric, K., Zaja, I.Z., Pavelic, A., Manger, M., Tkalec, M. (2017) Effects of short-term exposure to mobile phone radiofrequency (900 MHz) on the oxidative response and genotoxicity in honey bee larvae, Journal of Apicultural Research, 56:430-438
As a staunch reader and a lover of language, I maintain a book of quotations into which I copy out those stellar phrases and sentences that jump out from the pages with startling clarity. Here’s one that just about leaped into my quotation journal on its own, from Jenna Butler’s remarkable new book Revery: A Year of Bees, referring to the myriad afflictions managed and wild bees are facing these days:
“Just because bees can scrape by in these adverse conditions, that absolutely doesn’t mean that we can let ourselves off the hook . . . We need to start asking ourselves whether keeping bees going is good enough, or whether we truly need to think about bees thriving.”
Butler is a writer and ten-hive beekeeper living on an off-grid organic farm in central Alberta, where she also is a professor of creative writing and eco-criticism at Red Deer College. Her book is indeed a revery, the condition of being lost in thought.
It’s an unusual blend of reflection, practical insights into bee management and thoughts about changing climate, all woven tightly together with memoir of personal trauma and a life lived on and with the land. And, it was short-listed this October for the prestigious Governor General’s Literary Award for Nonfiction, indicating the quality of her writing and suggesting it’s a book of interest well beyond the beekeeping community.
Revery is in that rare but fine tradition of writing about bees from the heart, going back thousands of years. Writers such as Virgil, Butler, and Maeterlinck have enriched us with details about bee biology and management that anchor their love of bees with practical insights, coupled with awe and wonder at the marvelous adaptations manifested by social and solitary bees alike. Jenna Butler’s book is the latest in this lineage, placing bees in the larger context of the environment with which they interact and the lessons we humans can learn from these marvelous creatures.
The book’s format follows honey bees throughout a calendar year on her farm, beginning with January Winter and ending in December. Each chapter provides more than just clear writing about that season’s typical colony condition and management. She delves into deeper issues about how we manage honey bees today, how that is shifting and should continue to shift, and what honey bees as well as wild bees are telling us about climate change and other environmental conundrums.
Much of Revery is about healing, of the land we live on, the way we practice agriculture, the terrible tragedies of bee loss afflicting honey and wild bees alike, the lack of diversity in beekeeping, and Butler’s own journey from trauma. But what’s remarkable about her writing is that she is not strident or politically correct, but rather simply a person speaking from the heart with compassion and clarity about the challenges faced by bees, people and the land.
For bees, she is direct and clear about how interactions between monocropping, pesticides, poor nutrition and pests are decimating managed and wild bees. But she also writes with respect around the remarkable innovations that Alberta beekeepers have made over a couple of centuries keeping bees in a harsh climate, and speaks with sympathy about the economic challenges faced by commercial beekeepers today. Rather than divide, she writes with hope that we all can work together to create economically viable beekeeping in which bees as well as beekeepers can thrive.
She also writes about the changing nature of beekeepers in Alberta, with many younger beekeepers coming on the scene, including women and beekeepers of color becoming more prominent in both hobby and commercial operations. She is a great champion of diversity, agriculturally, environmentally, and socially, recognizing that diversity cushions us against change and provides a wealth of responses to draw from when challenged by new situations.
Butler explores the many ways beekeepers seek healing through bees, going well beyond the expected apitherapy treatments. She notes how some seek economic healing, hoping for financial independence and security, others find spiritual growth through bees, “creatures whose very existence . . . cause the humans tending them to monitor their own hearts carefully to avoid causing distress to the hives.” She simply but eloquently summarizes how her time with bees has helped her manage deep hurt and pain in her own life: “Beekeeping forces me to learn how to handle my own weather.”
Revery is a fine, fine book, and I encourage you to run, not walk, to your nearest independent bookstore and order it, post-quick. It really is that good.
Mark Winston’s most recent book, Listening to the Bees, co-authored with poet Renee Sarojini Saklikar, was awarded an IPPY 2019 Gold Medal Independent Publishers Book Award. This review first appeared in Bee Scene, the quarterly magazine of the British Columbia Honey Producers Association.
Author
Mark L. Winston, FRSC
Professor and Senior Fellow
Morris J. Wosek Centre for Dialogue
Simon Fraser University
3309-515 W Hastings St, Vancouver, B.C. V6B5K3 Canada
Mobile: 604-561-9080
Email: [email protected]
Personal blog and Website: www.winstonhive.com
Centre for Dialogue: www.sfu.ca/dialogue
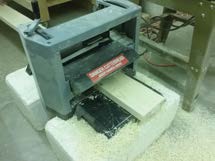
Making a side bar for a frame can be challenging. But it doesn’t need to be. I needed to build frames for a custom designed hive body (Modified Dadant hive body). This MD hive body had a height of 11¼” which required custom built frame side bars.
After watching multiple YouTube® demos, I combined two methods and rearranged some of the steps. The result was a method of creating side bars of any length desired that required only one unique jig to be made.
Note: “How to Make Beehive Frame Side Bars” from “Path of the Bees” was the primary reference I used. Thank you, Charlie! Reference: The two YouTube® videos I liked best were: How to Make Beehive Frame Side Bars Path of the Bees – Charlie https://youtu.be/YaF2G4lrafc This video uses a planer, jointer and table saw to accomplish the task. Rodger’s Shop – Bee to Z https://youtu.be/Ccop0TEfqw4 This video uses only a table saw to accomplish the task.
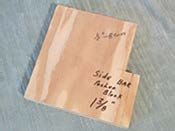
Parts – Frame bar side
2” x 6” x ??’ – with minimal knots and imperfections
Note: The width of the lumber is based on the width of a jointer available to you.
Note: Each “clear” section of your lumber will yield one side bar for each ½” of the width.
A 6’ board with no knots will give you 144 side bars with a length of 10¾”.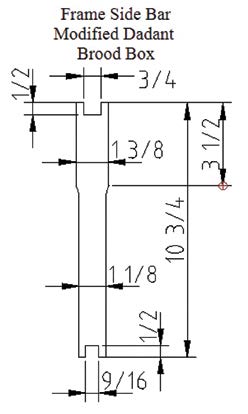
Construction
Please read the complete set of instructions and resolve any questions before starting the construction.
The following steps will make a side bar that is 10¾” long. This is the length of a side bar that is needed for a Modified Dadant hive of 11¼” height. The 11¼” height is based on the currently available 1” x 12” lumber in home improvement or lumber stores.
Note: A jointer and a planer were available for developing this article. Depending on the equipment available to you, you will have to modify steps to use the tools you have.
Note: If you need to calculate the length of a side bar for your specific hive body use the following information.
The total side bar length is ½” less than the height of the hive body. This length in conjunction with the standard ⅝” deep frame rest provides for the correct bee space above the top bar and beneath the bottom bar.
Note: The top portion of the side bar is 1⅜” wide and extends 3½” from the top of the bar where it then tapers to a 1⅛” width. The 3½” distance from the top of the bar is constant regardless of the length of the bar.
Note: This article assumes you will be using commercially available top and bottom bars for your frame.
Note: After setting up for a cut and cutting a test piece, use a commercially available side bar from the same manufacturer supplying your top and bottom bars, to double check your cut for correct saw settings.
Step 1: Check the measurements for the top and bottom notches.
Measure the top and bottom bars where the side bars join them. This is extremely important if you are making your own top and bottom bars. A ¾” x ½” deep notch for the top bar and a 9/16” x ½” notch for the bottom bar will be used for this article. If your measurements are different you will need to adjust the provided measurements.
Note: All manufacturer’s bar dimensions and even within a single manufacturer may vary slightly. I measured twelve top and bottom bars from the same manufacturer, and they varied in two of the dimensions. Choose a snug fit for whichever dimensions you use.
Step 2: Select the lumber.
Side bars are under significant stress when removing and handling the frames. Since you are going to invest time in making the side bars, select lumber that is knot free or lumber that has sections that are knot free for a minimum of the length of the side bars plus a couple inches.
Note: Knots and other imperfections can we worked around. After you slice the wood into the final side bar, reject the “bad” bars and use them for fireplace kindling.
Step 3: Size the lumber and square the edges.
Using a planer and a jointer smooth and square the lumber to a 1⅜” thickness.
Note: Depending on the lumber you choose the edges may be already squared.
Note: If you do not have a planer for sizing the lumber, use “Rodger’s Shop – Bee to Z” video as a primary reference.
Step 4: Trim the lumber to length.
Cut knot free sections of the lumber into blocks that are the length of your side bar (10¾” for this example).
Note: Depending on the size and location of the imperfections in the block, they can be worked around when slicing the block into its final thickness.
Note: Save the correctly sized (1⅜” wide) but unusable blocks of wood to be used for testing during the saw setup.
Checkpoint
You should now have multiple blocks of wood that are 1⅜” thick by 10¾” long. They need to be the exact length of your side bar. All the ends and edges should be square.
Cutting Notches
Step 5: Build a Frame Side Bar Notching Jig.
Reference: See “Build a Frame Side Bar Notching Jig”, to create a jig/pusher for your saw. This jig (pusher) will hold a 1⅜” side bar block in the correct position for cutting the top and bottom notches.
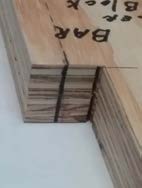
Step 6: Cut the top bar notch (¾” x ½”).
Using the jig, cut the top bar notch in the block end.
Note: As a sanity check before making any cuts, check that the jig is positioned snugly against the fence and the center of the dado blade is centered on the jig reference line.
Note: Before making subsequent cuts, verify the cut by comparing it to a commercial side bar or a previously cut and saved block or side bar.
Note: Multiple cutting passes may be necessary to achieve a consistent cut depth. A wide dado blade tends to raise the material during the cutting operation.
Step 7: Cut the bottom bar notch (9/16” x ½”).
Setup the saw for the bottom notch and cut a test notch and verify the setup. Then cut the bottom bar notches.
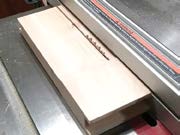
Step 8: Cut the ⅛” recessed sides (side bar bee space).
This step creates the unique profile needed by each side bar. By cutting the recessed sides with a jointer before you slice the block into individual side bars, you save a significant amount of time.
Attach a stop block on your jointer’s fence at the finished end of wood so the jointer removes all but 3½” from the top edge of the block. The depth of the jointer cut should be ⅛”. After cutting the first side, turn the block over and cut a matching recess on the opposite side.
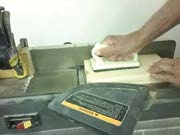
Using Jointer
Note: The 3½” full width top of each side bar is the same regardless of the length of the side bar.
Note: If you do not have a jointer, review the video (Rodger’s Shop – Bee to Z) for making a table saw jig that will perform the same function for a single side bar.
Warning: Be very careful. A jointer can be a dangerous tool if used incorrectly.
Step 9: Slice the blocks into ⅜” thick side bars.
Set your saw depth correctly with a ⅜” distance to the fence. Then slice individual side bars from the block.
Warning: Be careful and use pusher sticks.
Side bars are not difficult to make if you pay attention to details and measure correctly.
Suggestion: Make extra side bars. The setup for making any item takes time. Cutting extra items while the saw is setup is an inexpensive investment in material.
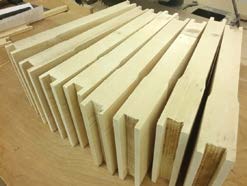
Finished Blocks
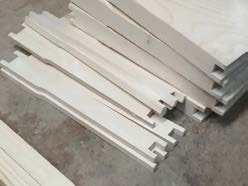
Stack of finished side bars

Frame Sidebar Jointer Setup
Slicing Sidebar
Build a Frame Side Bar Notching Jig
When using a saw to cut wood that extends above the saw fence the wood tends to drift from 100% contact with the fence. The result is an uneven cut. The Frame Side Bar Notching Jig will help correct this situation. If the notches are cut before the bee space on the sides of the side bar are cut, one jig will work for both the top and the bottom bar notches.
The difference between cutting the top and bottom notches is the width of the dado blade and the position of the saw’s fence.
Parts
¾” x 10” x 10” – 2 pieces
Construction
Finished Notching Jig
Step 1: Cut the part listed in the part list. Use the attached drawings to cut the jig.
Step 2: Glue the base pieces together.
Align the base pieces and glue them together.
Note: A 1½” thick jig is needed to keep the wood positioned against the fence correctly.
Step 3: Mark the center of the jig’s cutout for blade alignment.
Note: This mark is used to align the blade center to the jig and position the saw’s fence for both the top and the bottom notches.
Creation of the jig is now complete. This is the simplest jig I have ever made.
Usage
Place the correct dado blade on the saw. Then align the jig’s centering alignment mark with the center of the dado blade. Snug the fence against the jig while keeping the centering mark aligned. Set the blade height to the correct height and test the cut.
Blade Centering Line
Step 1: Install a dado blade (¾” – top).
Step 2: Calibrate the depth for the notch.
Using junk wood, adjust the dado blade to the ½” height. Keep adjusting the blade until the correct depth is achieved.
Hint: After setting the correct blade height, lower it to its lowest position while counting the revolutions of the height adjusting knob. Record the number of turns needed to achieve the ½” depth on the top of the jig. This information will help you replicate the notching with minimum of fine tuning.
Step 3: Align the blade on the centering line.
Set the blade to the correct height and using the saw’s fence, align the center line of the jig with the center of the dado blade. Then using a test piece of wood cut a notch to ensure everything is aligned correctly. Match the cut with a commercial side bar to double check the cut. Fine tune the positioning until you are satisfied.
Step 4: Cut the notch in one end of all the blocks of wood.
Note: Multiple cutting passes may be necessary to achieve a consistent cut depth. A wide dado blade tends to raise the material during the cutting operation.
Step 5: Change the blade to the other dimension (9/16” – bottom).
The top and bottom notch widths are not the same, therefore, the saw’s fence needs to be repositioned to keep the top and bottom notch centers aligned.
Use the previous steps to position the fence and the blade height for this width of dado blade.
Step 6: Test the notch alignment.
Double check the notch alignment, the centers of the notches should be aligned.
You can now cut top and bottom notches for your side bars with consistency.
Setting up for making a side bar takes time but once the saw is setup many can be made in a very short time.
Hint: Cut extra side bars once you are setup and checked out. The setup time far outweighs the cost of additional wood when all you need is an additional two side bars.
Build a Uniquely Sized Plastic Foundation
When you build a non-standard Langstroth hive body and you create non-standard frames, you are simply OUT-OF-LUCK finding commercially available foundation. This was our problem when we wanted to use plastic Rite-Cell® foundation by Mann Lake for the modified Dadant (19” x 19⅞” x 11¼”) hive body that we were developing. This extra deep hive body used standard 1” x 12” board available at lumber yards or home improvement stores. After creating 10¾” frame sidebars to match the hive body, we needed to modify the plastic foundation to meet the extra height of these frames. Luckily, the length matched the standard foundation length. Two foundations (a medium 6⅝” and a shallow 4¾”) needed to be joined to achieve the height needed (9⅞”). After joining the foundation, we will then cut it to the correct height.
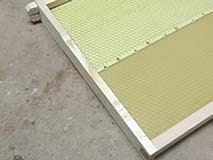
Finished frame with foundation
Design notes: The melting/piercing method of attaching two sheets of plastic foundation was selected after four different attempts. Eventually a $6.00 pencil point soldering iron solved the problem. The following methods were tried and rejected:
Drilling holes and wiring was extremely time consuming, and the joints were still weak.
Stapled joints – I was unable to find a sharp staple that could consistently penetrate the two layered plastic foundation.
Super glue (gel form) required fast assembly and the removal of the beeswax coating.
Acetone for melting the plastic was dangerous and required fast assembly and the removal of the beeswax coating.
Construction
Step 1: Calculate the foundation size.
Use an assembled frame and measure the distance between the bottom of the top bar the top of the bottom bar. Then add ⅜” to this measurement. This is the total height of the foundation needed for this frame.
Note: Make one prototype foundation to verify your measurements before committing to production.
Step 2: Make compatible joints.
Overlap the bottom of one sheet of foundation with the top of a second. Then use a pencil point soldering iron to pierce the joint every two inches. Turn the combined sheets over and perform the same piercing/melting between the previous welds. The result is a slightly thicker foundation for the ⅜” where the overlap occurs.
Hint: Use a wood strip to mark the piercing positions and help keep the soldering point aligned when joining the sheets of foundation.
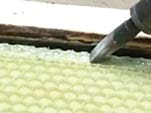
Melting bottom edge
Step 3: Cut the previous joined sheets of foundation to size.
Use a saw to cut the bottom section of foundation to size (9⅞” for this example).
Warning: Wear safety glasses when cutting plastic with a circular saw. Flying pieces of plastic are dangerous.
Hint: Cutting waxed foundation will leave bees wax on the saw’s table. Use a heat gun and paper towel to remove the wax.
Step 4: Melt the bottom edge to fit the bottom bar groove.
To allow the bottom edge of the foundation to slip into the bottom bar groove, you need to remove the raised cell design. Use a flat soldering iron to melt these cell impressions along the bottom of the foundation.
Hint: Position a piece of wood against the edge to be melted. Then use the wood as a guide for melting the bottom (or top) edge.
Simple to make, a non-standard height plastic foundation is possible.
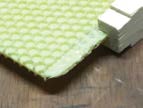
Cell impression free bottom
Bee stories abound and are as colorful as some of the keepers that tell them. Differences in operation sizes, circumstances, philosophies and opinions are what makes this group so interesting. So, who are the beekeepers and what role do they play in honey bee colony health? At the Bee Informed Partnership, we use data to tell bee stories.
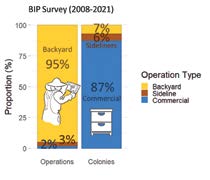
Figure 1 Proportion of beekeepers of each type of operation (left) compared to the cumulative number of colonies managed by each size of operation (right).
In the BIP National Colony Loss & Management survey, we group beekeepers by operation type, based on the number of colonies they manage. We define backyard beekeepers as those keeping 50 or fewer colonies, those keeping between 51 and 500 colonies are classified as sideliner beekeepers and those managing 501 or more colonies are considered commercial beekeepers.
According to the last 14 years of the BIP survey data, backyard beekeepers represent the vast majority of beekeepers (95%) but account for only 7% of colonies managed (Figure 1). Conversely, commercial beekeepers represent only 2% of the operations, but manage most of the colonies represented in the survey (87%). We have good evidence to show that this ratio is a fair representation of the US beekeepers thanks to the NASS Census of Agriculture, despite the fact that only operations that qualify as “farms” are counted in the Census. According to NASS Census, operation types rank at 93%, 4% and 3%, and colonies number at 6%, 9% and 85% for backyard, sideliner and commercial beekeepers respectively (special tabulation provided upon request by NASS).
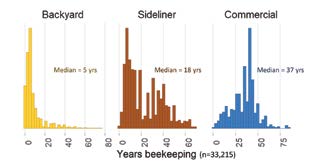
Figure 2 Years of beekeeping experience for backyard beekeepers (yellow bars on the left), sideliner beekeepers (red bars in the center) and commercial beekeepers (blue bars on the right).
Back to the BIP survey results, in the U.S., backyard beekeepers have a median of three colonies, sideliners have a median of 100 colonies and commercial beekeepers have a median of 2,000 colonies, with some of the larger operations tallying 50,000 colonies or more. Interestingly, the level of beekeeping experience for each group varies significantly. Figure 2 shows an average of five years of beekeeping experience among backyard beekeepers compared to 18 years for sideliners and a whopping 37 years of experience for commercial beekeepers.
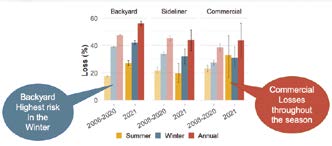
Figure 3
Average historical colony loss percentages for summer (yellow), winter (blue) and annual (red) for 2008-2020 (light colored bars) compared to 2020-2021 beekeeping season (brightly colored bars) for backyard beekeeper (zero to 50 colonies), sideliner (51-500 colonies), commercial (501+ colonies).
Separating the responses by operation size also provides an interesting look at seasonal and annual losses. Figure 3 shows that over the full 12-month season (red), backyard beekeepers experience greater annual losses than commercial beekeepers. A potential explanation for the lower annual losses by commercial beekeepers can be seen by looking at the Varroa management practices across operation sizes shown in Figure 4.
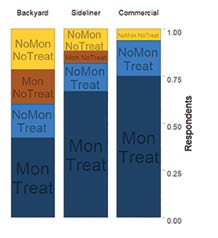
Figure 4 Proportion of respondents for each type of operations, backyard (left), sideliner (center) and commercial (right) beekeepers who do not monitor & do not treat (yellow), do monitor & do not treat (red), do not monitor & amp; do treat (light blue) and do monitor & do treat (dark blue).
Nearly all (>95%) commercial beekeepers treat for Varroa and over 75% both monitor and treat for Varroa. These practices are less prevalent among backyard beekeepers with about 60% reporting that they treat for Varroa and less than 50% performed both recommended practices (monitoring & treating).
In addition to higher annual losses, backyard beekeepers tend to have a higher proportion of losses occurring in the Winter (October through March) than in the Summer (April through September), which contrasts with commercial beekeepers who tend to lose their colonies more equally between the two seasons.
This might result from commercial beekeepers being more likely to abide by the old adage “take your losses in the fall” and combine weak colonies before the Winter. For commercial beekeepers, it is often not worth the time, energy, or resources necessary to attempt saving weak or small colonies when they can combine colonies to have a better chance of being viable pollination units in the spring. So, keeping in mind the different types of beekeepers, their level of experience and how this all translates into Varroa monitoring and treating practices and colony losses, what type of beekeeper are you?
]]>